How to Change a Whole House Water Filter: Buyer’s Guide

Keeping your home's water clean and tasting fresh usually comes down to one crucial maintenance task: changing your whole house water filter. If you’ve ever noticed a funny smell or a drop in water pressure that seems to come out of nowhere, your filter might be the culprit. But don't worry, learning how to change a whole house water filter is surprisingly manageable and doesn't require a plumbing degree.
Manufacturer specifications typically recommend a replacement every three to six months, depending on your water quality and usage. A properly functioning filter, often rated down to 5 microns (that's about 1/17th the width of a human hair), ensures that sediment, chlorine, and other common contaminants are effectively removed, keeping your taps running clearly. This guide will walk you through everything you need to know to tackle this job yourself.
Why Changing Your Whole House Water Filter Matters
Over time, the filter cartridge inside your whole house water filter system gets saturated with all the impurities it’s designed to capture. Think of it like a sponge; once it's full, it can't absorb anymore. This saturation can lead to a cascade of issues that impact your daily life and your home's plumbing.
Our research indicates that allowing a filter to become completely clogged is a common mistake that leads to a noticeable decline in water quality. This isn't just about taste or smell; a choked-up filter can also restrict water flow throughout your entire house, leading to frustratingly low pressure at every faucet and showerhead. Furthermore, letting debris build up can sometimes put unnecessary strain on other parts of your plumbing system and even affect the performance of appliances that rely on clean water, like your dishwasher or washing machine.
Essential Tools and Supplies You'll Need
Getting the right tools ready before you start makes the whole process much smoother and less frustrating. Most of what you’ll need is pretty standard for basic home maintenance.
Here’s what our research and aggregate user feedback suggest you should have on hand:
- Replacement Filter Cartridge: This is the heart of the operation. Ensure you have the correct size and type for your specific filter housing. Double-check the micron rating and filter media (like sediment or carbon) to match your needs.
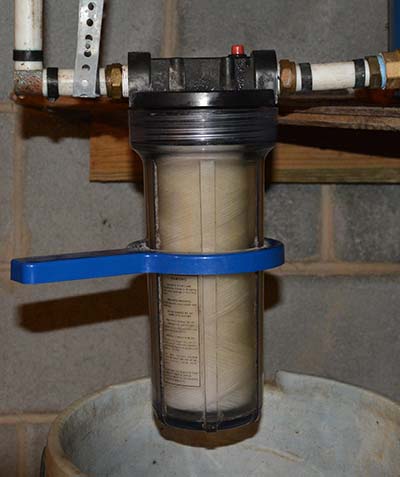
- Filter Housing Wrench: A specialized, often plastic, wrench is used to grip the bottom of the filter housing and provide leverage for unscrewing it. Most whole house filter systems include one with the initial installation.

- Bucket: A sturdy bucket placed underneath the housing will catch any residual water that spills out when you disconnect it, preventing a mess on your floor.
- Towels: Keep a few old towels handy for wiping up drips and drying parts as you go.
- Food-Grade Silicone Lubricant: This is crucial for lubricating the O-ring. Using petroleum jelly or other non-food-grade lubricants can degrade the rubber and lead to leaks. Check manufacturer recommendations for the correct type. Websites like https://www.pentair.com/, a prominent manufacturer in water treatment, often detail the specifics of their system maintenance.
- New O-ring (Optional but Recommended): The rubber O-ring that seals the housing to the top manifold can sometimes get compressed or nicked. Replacing it with a new, lubricated one when you change the filter can prevent future leaks.
Step-by-Step: Changing Your Water Filter Housing
When it comes to physically swapping out the filter, the process is straightforward and visual. The most common type of whole house filter housing resembles a large, clear or opaque plastic cylinder that screws onto a mounting head. We'll focus on this standard design, which is found in countless homes.
Step 1: Shut Off the Water and Relieve Pressure
This is the absolute first and most critical step to avoid an unexpected flood. You need to stop the flow of water into the filter system and then release any pressure already present.
- Locate your main water shut-off valve. This is usually found where the water pipe enters your home, often in a basement, crawl space, or utility room. Turn the valve handle so it is perpendicular to the pipe to completely shut off the water supply to your entire house.
- Open a faucet in your home. Turning on a faucet, like one at the kitchen sink, after the main valve is closed will drain the remaining water from the pipes. Let it run until it becomes just a trickle. This relieves pressure in the lines.
- Press the housing's pressure relief button. If your filter housing has a small button or bleed valve on its top cap, press it now. You should hear a hiss as trapped air and water pressure escapes. This makes unscrewing the housing much easier and safer.
Step 2: Loosen and Remove the Old Filter Housing
With the water off and pressure relieved, you can now carefully detach the filter housing. This part can sometimes require a bit of effort if the housing hasn't been opened for a while.
- Position your bucket. Place the empty bucket directly beneath the filter housing to catch any drips and spills.
- Use the filter wrench. Grip the bottom part of the housing firmly with the filter housing wrench. Turn the wrench counter-clockwise. It might feel stiff initially; this is normal. Apply steady pressure.
- Unscrew by hand. Once it’s loosened enough, you should be able to unscrew the housing the rest of the way by hand. Be prepared for a small amount of water to drain out as you loosen it. Carefully lower the housing and place it in or next to your bucket.
Step 3: Swap Out the Old Cartridge
Inside the housing, you'll find the old, used filter cartridge. Removing it is usually quite simple.
- Pull out the old filter. Grasp the old filter cartridge and pull it straight up and out of the housing. It might be a little snug, but it should come free with a gentle tug.
- Dispose of the used filter. Follow your local waste disposal guidelines for used filter cartridges.
Step 4: Clean the Housing and Inspect the O-ring
This is a great opportunity to do a quick clean and check your housing's seal. Cleanliness here prevents future problems.
- Inspect the housing interior. Look inside the housing for any sediment or debris that may have accumulated. You can wipe it clean with a soft cloth or sponge. If needed, a mild soap can be used, but be sure to rinse it thoroughly.
- Examine the O-ring. On the very top rim of the housing, where it seals against the mounting head, there's a rubber O-ring. Check it for any nicks, cuts, or signs of wear. If it looks damaged or feels brittle, it's definitely time to replace it.
- Lubricate the O-ring. If you're reusing the old O-ring (and it's in good condition) or installing a new one, apply a thin, even coat of food-grade silicone lubricant all around it. This helps create a watertight seal and makes the housing easier to screw back on and remove the next time.
Step 5: Install the New Filter Cartridge
Now it's time to insert the fresh filtration media.
- Orient the new cartridge. Most filter cartridges have arrows indicating the direction of water flow. Generally, the water should enter the housing and flow through the cartridge in the direction of the arrow. For most standard whole house filters, the water flows from the outside in, or bottom to top, through the cartridge.
- Seat the cartridge. Carefully slide the new filter cartridge into the housing. Make sure it sits down snugly and properly aligns with any standpipe or connection at the bottom of the housing. It should stand upright without wobbling.
Step 6: Reattach and Tighten the Housing
With the new cartridge in place and the O-ring seated correctly, it’s time to put the housing back together. This is where you want to be precise to ensure a leak-free seal.
- Screw the housing on by hand. Carefully align the threaded part of the housing with the mounting head and begin turning it clockwise. You should feel the threads engaging smoothly. If you encounter resistance, stop. You might be cross-threading it, which can damage the housing and prevent a proper seal.
- Tighten with the wrench. Once the housing is snug by hand, use your filter housing wrench to tighten it another quarter to half turn. The goal here is a secure fit, not to overtighten. Over-tightening can crack the plastic housing or make it extremely difficult to remove during your next filter change.
Step 7: Turn Water Back On and Flush the System
This is the moment of truth. We’ll slowly reintroduce water and then flush out any air and residual dust from the new filter.
- Close the faucet you opened earlier. Make sure any taps you turned on to relieve pressure are now closed.
- Slowly turn the main water valve back on. Open your main water shut-off valve gradually. Listen for any immediate sounds of spraying water around the filter housing.
- Run the water. Go back to the faucet you used to relieve pressure and open it again. Let the water run for at least five minutes. This flushes out any air pockets trapped in the filter and plumbing, as well as any fine particles from the new cartridge. You might see cloudy water initially; this is normal and will clear up as you flush.
- Check for leaks. After flushing, close the faucet and carefully inspect the filter housing for any signs of water weeping or dripping. If you spot a leak, try tightening the housing slightly more. If the leak persists, you may need to re-examine the O-ring and housing seal.
Common Mistakes to Avoid During Filter Changes
Even with a straightforward process like changing a whole house water filter, there are a few common missteps that can lead to frustration or even damage. Being aware of these can save you time and prevent potential problems down the line.
- Forgetting to shut off the water: This is the most critical error. Always confirm the main water valve is completely closed before attempting to unscrew the housing. Expecting a little drip is one thing, but a full-on gush is a sure sign the water supply wasn't shut off.
- Overtightening the housing: While you want a secure seal, aggressively tightening the plastic housing can lead to cracks. This is especially true for housings that are several years old. Follow the guidelines for a snug fit, usually a quarter to half turn past hand-tight.
- Not replacing or lubricating the O-ring: The O-ring is the primary seal. If it's damaged, dry, or missing, you're almost guaranteed to have a leak. Always inspect it and re-lubricate with silicone grease.
Checking for Leaks and Proper Seals
Leaks are the most common problem after a filter change. Often, a visual inspection is all that's needed to pinpoint the cause.
- Look for drips: After turning the water back on and flushing, visually check the seam where the filter housing meets the mounting head. Run your hand around it to feel for moisture.
- Listen for hissing: A persistent hissing sound can indicate a small leak, often due to a small gap in the seal.
- Address immediate leaks: If you notice a leak, shut off the water, drain the system again, and re-examine the O-ring placement and housing tightness. Sometimes, slightly repositioning the O-ring or giving the housing another small turn with the wrench is all it takes.
How Often Should You Really Change Your Water Filter?
Determining the right schedule for changing your whole house water filter cartridge depends on a few key factors, and it’s not a one-size-fits-all answer. Relying solely on a calendar can sometimes mean replacing it too early or too late.
- Water Usage: Households with high water consumption will naturally use up a filter’s capacity faster than smaller households. A family of four using ample water will need to monitor their filters more closely than a single occupant.
- Water Quality: If your local water supply has high levels of sediment, iron, or chlorine, the filter will clog up quicker. Areas with known water quality issues may require more frequent changes. You might notice this if your water starts to look cloudy or smell strong again.
- Filter Type: Different filter media have different lifespans. For example, a basic sediment filter might last longer in terms of volume, while an activated carbon filter's ability to absorb chlorine or taste/odor compounds can be depleted more quickly.
Manufacturer guidelines, like those found on official product pages for brands such as Flow-Rite, typically suggest a range of 3 to 6 months. However, paying attention to your home's water pressure and taste is often the best real-world indicator.
Keeping Your Whole House Water Filter in Top Shape
Beyond just changing the filter cartridge on schedule, there are a couple of simple practices that help ensure your whole house water filter system operates efficiently for the long haul. These aren't complicated procedures but rather good habits to maintain.
- Regular O-ring maintenance: As we discussed, always inspect and lightly lubricate the O-ring during each filter change. This prevents it from drying out and becoming brittle, which is a primary cause of leaks and premature failure.
- Housing inspection: Periodically, perhaps once a year, give the plastic housing a good visual inspection during a filter change. Look for any signs of cloudiness, fading, or potential degradation, especially if the housing is exposed to direct sunlight. While NSF International recommends materials that are safe for potable water, extreme conditions can still affect longevity. Aggregates of user feedback suggest that older housings, especially those more than 5-7 years old, warrant closer inspection.
When to Call a Professional
While changing your whole house water filter is a perfectly do-able DIY task, there are times when it's smarter to let an experienced plumber handle it. Knowing when to call for help can save you from more significant problems.
- Persistent leaks: If you've tried replacing the O-ring, lubricating it, and tightening the housing properly, but you still have a leak, there might be a crack in the housing itself or an issue with the mounting head. These require professional diagnosis.
- Stuck housing: If you cannot budge a filter housing with reasonable force using the wrench, or if you’re worried about causing damage by applying too much pressure, it’s time to call it quits and seek expert help. A professional plumber has tools and experience to handle seized components.
- Complex systems: If your whole house filtration system is more elaborate than a single-stage housing (e.g., systems with UV sterilizers, multiple stages, or integrated bypass valves), it might be beyond a simple DIY change.